
5 Apps Every Cinematographer Needs
Rather than focusing on how phones can be used to shoot projects, let's look at how they are more often used by professional filmmakers - not for their filming ability but rather by using various apps as cinematography tools.

INTRODUCTION
From movies like Tangerine, to High Fantasy, or 28 Years Later, it's been proven that using smartphones as a cinema camera is a possibility.
However, rather than focusing on how phones can be used to shoot projects, I’ll instead show how they are more often used by professional filmmakers - not for their filming ability but rather by using various apps as cinematography tools.
Before we start I should note that I don’t have any affiliation or sponsorship with any of the apps mentioned, and that this video is less about recommending specific applications or software than it is about showing the kinds of apps and how they are incorporated into the workflow of industry filmmakers.
1 - VIEWFINDER
The app that is most often used on professional sets by cinematographers is a viewfinder. This is a cheap alternative to the old school method of using a pentafinder - an optical viewfinder which you can attach your different lenses to and look through to pre-visualize the frame.

Using an app to do this both saves on renting a pentafinder and makes it quicker to flick through different lens options with the tap of a button.
These apps exist as a digital scouting tool that simulates how a shot will look on various camera sensors and lenses - without needing the actual camera gear in your hand.
They can therefore be used for pre production planning, to view and capture frames when you’re recce-ing - visiting a location before the shoot: which can later be used as reference frames in your storyboard. Or, it can be used on set, in collaboration with the director, to easily communicate your vision, or flick through different focal length lenses or camera positions until you settle on a frame everyone is happy with.

This precise information about the lens and placement of the camera can then accurately be communicated to your camera and grips team - saving time and unnecessary switching to different lenses or moving the camera around to find the right spot.
The reason you probably don’t want to just use your camera phone, instead of a viewfinder app, to line up a shot comes down to field of view.
The two most popular apps, Artemis - which I use, or Cadrage, are paid apps at $20 or $30 respectively. They come with a wide selection of cameras and lenses which you can plug in based on the gear which you’re using.
This provides a very accurate field of view which will match the shot width of how the actual lens will look on the actual camera, unlike the stock standard camera app which will just show a wide angle field of view.
They also provide options such as adding the frame lines for the aspect ratio you’ll be shooting in, exposure adjustment, and the capability of capturing video or stills for different projects with camera and lens metadata that you can refer back to once you’re on set, or use to plug into storyboards.
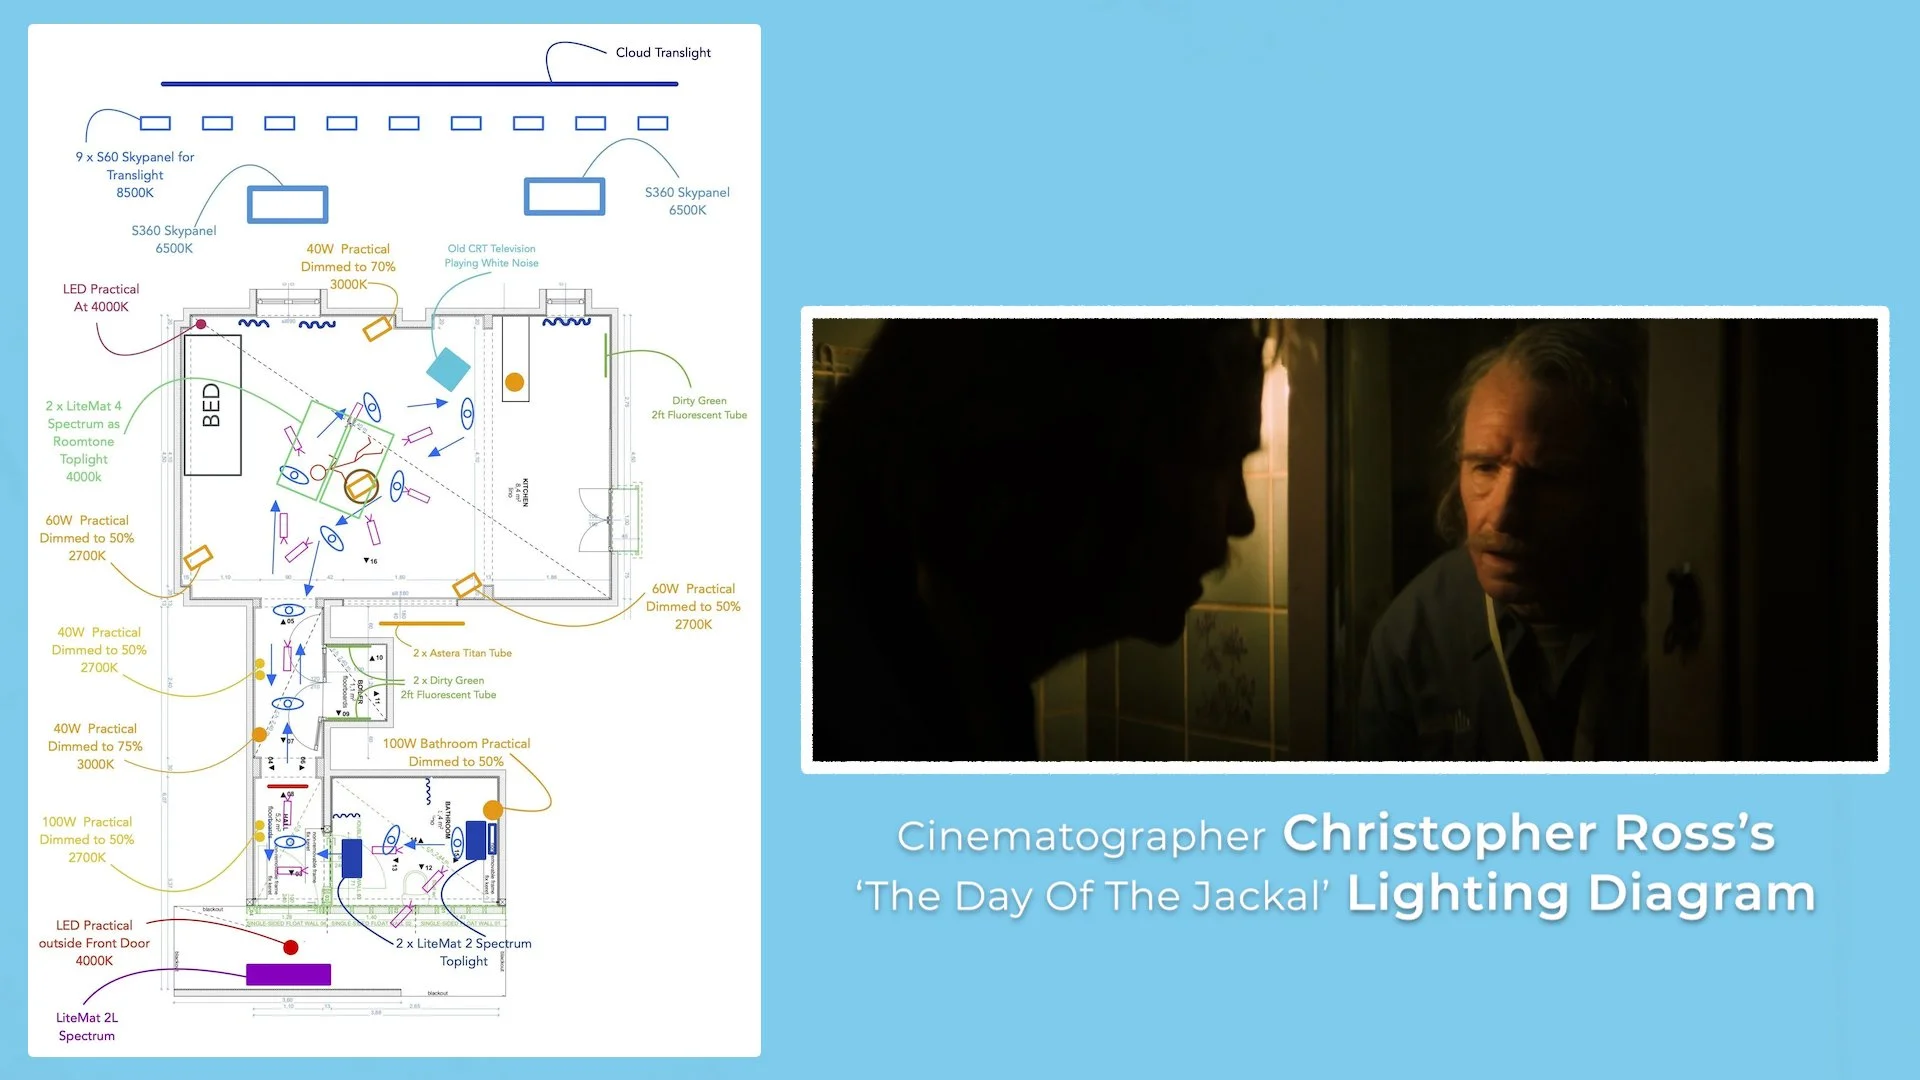
2 - LIGHTING DIAGRAM
In the same way that a viewfinder allows you to pre visualize and plan for the exact frame you want, a lighting diagram allows cinematographers to plot exactly how they’d like their lamps set up at each location or set.
This is especially useful for pre-lighting - where certain electrical crew members are sent ahead to the next location, before filming, to rig and set up fixtures before the rest of the crew arrives - which saves on set up time.
Giving your gaffer a detailed lighting plan to work with will ensure the lights are correctly positioned when you arrive.
This blueprint can be created any number of ways: from physically drawing a sketch on paper, to plotting where your lights will be positioned using an app.
My methodology is to bring a notebook to the recce. At each location, I’ll take a couple photos of the space on my phone, then roughly sketch where I imagine placing the light sources.
It’s also possible to use a lidar scanning app, a laser or tape measure to make floor plans with more accurate measurements - if specific distances are required such as for rigging polecats between walls.
After the recce is complete and I have a bit more time, I’ll then use an app to more carefully create a bird’s eye view floor plan of exactly what gear I’ll be using and where it’ll be placed based on the location photos and sketches.
There are some more advanced paid software options for this that also come with 3D modelling capabilities, such as Vectorworks Spotlight.
Or, you can design these plans yourself in software such as Adobe Photoshop or Illustrator, with the option to purchase custom illustrated assets such as from Film Set Objects.
But I usually just use either the diagram feature in Sidus Link - Aputure’s app which is available for free download, or the Nanlink app - which is Nanlite’s free software.

These come with illustrated drag and drop options such as lights, textiles, people, and furniture, that you can use to build your diagrams - which can later be exported and passed on to the relevant crew members who will be assembling these plans in the real world.
Although I like this app workflow, these diagrams can also be created by just roughly hand drawing them - as ultimately it's not the diagrams that’ll be seen and judged but the actual lighting in the footage.
3 - FILM EQUIPMENT APPS
We mentioned how the Sidus Link and Nanlink apps can be used for making diagrams, however they are actually primarily designed for another function - controlling and adjusting film equipment - in this case lights.

Once you have your lights set up, the next step is to turn them on and balance the levels. In other words, different fixtures will need to be dimmed up or down until you arrive at a brightness and colour temperature for each lamp that you’re happy with.
Rather than needing to have a crew member stand next to each lamp and do this manually, it’s much easier to use an app. This allows DPs to stand at the camera or monitor and adjust the exposure of the light levels by eye.
The app required will depend on what brand of lights you’re using. Aputure lamps can be wirelessly adjusted via bluetooth with Sidus Link, while Nanlite fixtures use the Nanlink app.
Some gaffers may also have their own DMX controller board which they link all their lights to - which fulfills the same function.
Then there are other film equipment apps which offer wireless control, such as the Ronin app, for adjusting and calibrating gimbal motors.

Monitoring apps which link to transmitters like the RavenEye which runs through the Ronin app, the HollyLand, or VAxis app which provide a relatively low cost monitoring option. Or apps that can be used to trigger a camera to roll or adjust exposure settings such as the GoPro or Blackmagic app.
4 - WEATHER
One of the most important jobs a DP fulfills is lighting, and, if you’re shooting outdoors, this will largely be determined by the natural sunlight and weather conditions.

Therefore it's important to keep a close eye on the changing weather conditions and where in the sky the sun will be at the shooting location. During the recce, for both exterior and interior locations I’ll consult an app which predicts the path of the sun.
You can then use this as a guide to your lighting, for example finding a frame, blocking, and time of day for shooting where the actors will get a flattering three quarter backlight from the sun. Or, for interiors, check whether the sun either will, or won’t, come directly through a window.
For this I use an app called Sun Seeker. It has a 3D mode, which uses your phone’s camera to highlight the path of the sun and where it’ll be at different times during the day. You can also take photos in this mode during the recce, to remind yourself of sun locations for later.
Another useful free sun tracking tool that I use is ShadeMap - which is especially useful if you aren’t able to recce locations or perform a light study in person. This uses Google Maps data, to give a prediction of what area will be in shadow at a particular time of day.

You can search any location and scroll through different times and dates. It’s an incredibly accurate tool, which takes into account the shadows cast by buildings, trees or other objects.
Apart from these specific studies it's also important for filmmakers to constantly be checking various weather forecasts - so that they know what is coming and try to schedule the shooting of exteriors around any undesired weather as best as possible.
5 - CREATIVE TREATMENTS
If you’re competing for a freelance, HOD job in filmmaking, pitching for funding, or just want to communicate your creative vision you may need to create some kind of a visual treatment.
This could take the form of a slideshow, a mood board, a lookbook, or a more practical form like a storyboard.
There are a number of apps or software that you can use to put together creative treatments. When it comes to a mood board, I like to use Milanote - which is like a freeform page that you can attach references, images, text, or palettes to in order to articulate your vision.

You can also share and work together on this document with other collaborators.
For more formal treatments which you have to present, I like working in Google’s G-Suite on docs, sheets or slides. Although similar software from Apple or Microsoft works just as well.
For each project I’ll create a new folder on Google Drive which I can populate with different templates - such as a camera specs and gear list sheet, a visual treatment slide, grade document, a folder for images from the viewfinder app which were taken on the recce, and a storyboard sheet.
This helps me to stay organised, better prep for each project, and create visual documents based on the director’s input that can clearly communicate the kind of look, tone and style that we’ll try to achieve on set.

How To Shoot A Scene In 5 Steps
Each production should follow a standard process which can be broken down into five easy steps: blocking, technical setup, rehearsal, final checks, and shooting.

INTRODUCTION
The first time you step onto a film set it’ll likely seem like utter bedlam. Different people, hustling around, performing tasks, at a speed, seemingly at random. It may seem chaotic but there is in fact a method to this madness.

Whether you’re on a student film or on an industry film set, each production should follow a standard process which can be broken down into five easy steps: blocking, technical setup, rehearsal, final checks, and shooting. Let's go over these five steps in detail to show you how to shoot a scene.
1 - BLOCKING
Constructing a scene is a very technical process that involves input from multiple departments, and shooting multiple camera angles, or pieces of a puzzle, which can later be assembled into a scene through editing.
It’s of utmost importance that before you begin shooting, everyone on set knows how the scene will unfold and how it will be shot.
A classic beginner, student filmmaker mistake is to just start shooting a scene straight away. This can become a problem if, halfway through shooting you suddenly realise that the actor moves outside of an area of the set which doesn’t have any lighting, that a key prop that the actor needs to interact with is missing, or that an actor performs the scene very differently to how the director imagined it.
To avoid any number of these mistakes, which could mean starting over shooting the scene from scratch and losing a bunch of time, the first step is to perform what is called a ‘blocking’.

Blocking a scene involves planning the choreography, movements and positions of the actors - while also considering their relationship and proximity to the camera, props, set and other elements.
Industry sets are run and organised by a crew member called the first assistant director, or 1st AD. They will make an announcement that there will be a ‘blocking’ and say that it is ‘the director’s floor’.
This signals that all other technical crew, besides the 1st AD, director, actors, continuity supervisor, cinematographer and perhaps the camera operator are to clear the space and be quiet to allow for a creative focus.
The director will then explain the scene to the actors and tell them the positions and movement they imagine them making. The actors will then do a run through of the scene, performing their dialogue and moving through the set. During this process the director may interject with ideas for their actions, performance or position.
If the actors struggle to remember any lines the continuity supervisor will be there to cue them. During the blocking the director and DP may also communicate about the different shots and angles they want to film.
If there are specific positions that the actors need to land on during the scene, then the 2nd AC will place a tape mark - with a different colour for each actor - down on the floor for them as a reference point for where they must stand.
After the key creative crew have viewed the scene it’s time to move to step number two.
2 - TECHNICAL SETUP
The 1st AD will announce that it is now a ‘technical floor’. This is a cue for the actors to leave the space and for crew members to enter and begin setting up for the shot.
By now, the director and cinematographer should have worked out all the shots that they will need to get for the scene - either based on a shot list or storyboard they created during pre-production, or based on ideas they got from watching the blocking.
The cinematographer will then communicate the technical setups that they require to his technical lighting, grips and camera team based on the planned shots. This will include things like deciding on a position for the camera or type of camera movement and what grips equipment is needed for that. Communicating to the camera team what focal length lens, filters or type of camera build they need for the first shot.
And what lights they require for the scene and where they need to be positioned and set up.

DPs who are well prepared may have already created a lighting diagram, or briefed their lighting team on what is needed prior to them arriving at the location. The reason cinematographers will often pre-light is because the time it typically takes to set up lights will be longer than the time it takes to set up the camera or grips equipment.
However, if there is a more complex grip setup for a shot that has been predetermined, like laying a large amount of dolly track, then the grips team may be sent to prepare this prior to the blocking to save on time.
In the case that the electrical team has already ‘pre-lit’ the set before the blocking, at this stage the DP may ask for additional lamps, or repositioning of the fixtures now that they’ve seen the space that the actors will move in it.
Once a camera is placed in position DPs will be able to adjust settings like exposure and white balance. They may also ask for a ‘stand in’ - someone who will position themselves on the actors mark so that they can adjust their lighting or camera positioning to them.

This stand in will often be a crew member, although for high budget, long form jobs they may even hire a person as a ‘stand in’ specifically for each main actor - who has a similar body size and skin tone - so that the exposure and camera height will be matched when the actors come to shoot the scene.
Other departments, like art - who dress and design the look of the set, wardrobe and make up will now also perform their technical tasks. Depending on scheduling and prep time, they may have already done the bulk of their setups and will use this time to refine things based on the blocking.
Once the camera has been positioned for the first shot, lighting is set up and the actors and set have been dressed, it’s now time to move onto the next step.
3 - REHEARSAL
With tech setup out the way, the 1st AD will call the actors to set, who will now all be in wardrobe and make up. It’s time to run a full technical rehearsal which is where actors will fully play out the scene, and the camera operator will practice following the action of the actors.

Rehearsal also gives a chance for other departments to prepare for the first take. For example, focus pullers will be able to find distances for the various marks that the actors will hit during filming.
If any complex actions are involved, such as running, it also gives both the technical operators of the camera and the actors a chance to find a speed which works - syncing the timing of the performance with the speed of the camera movement.
The rehearsal is also a legacy from the days of shooting on film stock, before high quality monitors for focus pullers - when they had to pull focus by using marks, their eyes and distance perception.
Rehearsing and making sure all aspects of the take would be correct before actually starting to film, helped to minimise the use of the precious and expensive 35mm film as they would get a take the director was happy with in fewer attempts.
Now although this step is pretty vital, if I’m completely honest, it is a step which in my experience is gradually phasing out of productions - which these days almost always use digital cinema cameras and no expensive film stock.

In order to maximise the amounts of takes in the edit and potentially save time if technicians get a lucky first take where everything lines up, many modern 1st ADs will push to immediately shoot straight after the technical setup - which is called ‘shooting the rehearsal’.
4 - FINAL CHECKS
Now everyone should almost be ready to shoot. This is the time to do any final touches which were noticed during the rehearsal, and could include things like slightly altering the mark of an actor, moving dressing around in the back of the shot, slightly dimming up or down on a light, or adjusting how the camera will be operated during the take.
At this stage the 1st AD will call for ‘final checks’. This term applies to make-up and wardrobe and gives them a chance to make any minor adjustments to the appearance of those in front of the camera before shooting.

In most cases these adjustments will be small tweaks, like neatening up the wardrobe, or setting the hair in its perfect position. However, for certain specialist shots, which involve more extensive make-up, such as fake blood, this will now be applied.
5 - SHOOTING
With final checks done it’s now time to shoot. To start this process the 1st AD will announce, ‘board in, roll sound’. This is the cue for the 2nd AC to put their clapperboard into frame and for the recordist to roll audio.
Audio is rolled first as, again, in a throwback to the old days of film, audio tape was cheap, but 35mm film was much more expensive and you’d therefore wait until the last second to roll the camera to avoid wasting money.

With the board positioned in the centre of the frame and the sound rolling, the 1st AD will call ‘roll camera’. The focus puller will press the red button and announce ‘speed’, the 2nd AC will then announce the shot numbers on the board and once ‘mark’ is called will give it a clap.
The final thing left to do is to call ‘action’. Depending on the director, they may call this themselves or prefer to let the 1st AD call it. On this cue the actors will play out the scene until the end when ‘cut’ is called and you’ll have your first take in the bag.
At this point either the director will be fully satisfied and ready to move onto the next shot, or, more than likely, would have found an adjustment they’d like to make and would like to shoot another take.
Here they will provide notes as to what they want changed on the next take. This could either be a performance note for the actors, a technical note for the crew, or notes to both.
Between each take, the final two steps in the process will be repeated. So, after each take the director will give notes, the 1st AD will call for ‘final checks’ and then they will shoot another take.

Once the director is satisfied with the take, the crew can start setting up for the next shot, setup or camera angle. Before everyone begins to move though, the old school AD phrase at this time is ‘check the gate’ - another relic from the days of film where after each successful shot the focus puller would check the film’s gate to ensure it was free of dust, dirt, hair or any artefacts which would make the footage unusable. If everything is clean the response from the 1st AC is ‘good gate’.
Although these days, unless you’re actually shooting on film, this phrase is only used metaphorically or met with a confused look by younger crew.
If it’s a very quick, simple setup change which should take a couple of minutes, like keeping the camera in the same position but changing to a longer focal length lens, or changing to a different angle with a handheld camera - then the actors will likely wait on set.
However, if the crew needs time to reposition gear, then the 1st AD will tell actors to ‘stand down’ - a nice way of getting them out the way and giving space for the grips to reposition heavy pieces of gear.
Between each new shot a condensed version of steps two to five will be repeated. So, a mini tech setup where the angle, lens or camera movement is changed, the 2nd AC ‘slates up’ their board, the 1st AC checks their new focus marks and the DP tweaks their lighting based on the new frame. This is followed by final checks and shooting.
Once the director has a good take of all the angles that are required to cut the scene together, the 1st AD will announce ‘scene complete’ and give instructions about the next scene or location move.